
Graffiti & Vandalism Detection
Flag unauthorized markings or property damage on infrastructure
datasciencealliance-org.classify.detect-vandalism:latest
Prompt
Determine the primary content of the image and assign exactly one label: ['Pass_clean', 'Fail_vandalized']. Focus only on the single main piece of infrastructure or public/commercial property that is the clear subject of the image, such as a wall, shutter, sign, bench, transit vehicle, or utility box. Ignore background items, unrelated objects, people, and vehicles that are not the main subject.
...Run the full prompt in your EyePop.ai dashboard
Input
Image
Output
Pass_clean, Fail_vandalized
Image size
640x640
Model type
EyePop.ai VLM

How It Works
Classify with Graffiti & Vandalism Detection
How it works: As its name implies, the Classify Image task on the Abilities tab does exactly that: it classifies an input image into a category. We can use this to determine whether a piece of infrastructure (a wall, sign, transit car, or similar public asset) has been defaced or damaged. Detecting graffiti and vandalism quickly is vital for public safety and municipal upkeep, as unaddressed damage can invite further vandalism, lower property values, and signal neglect to the surrounding community.
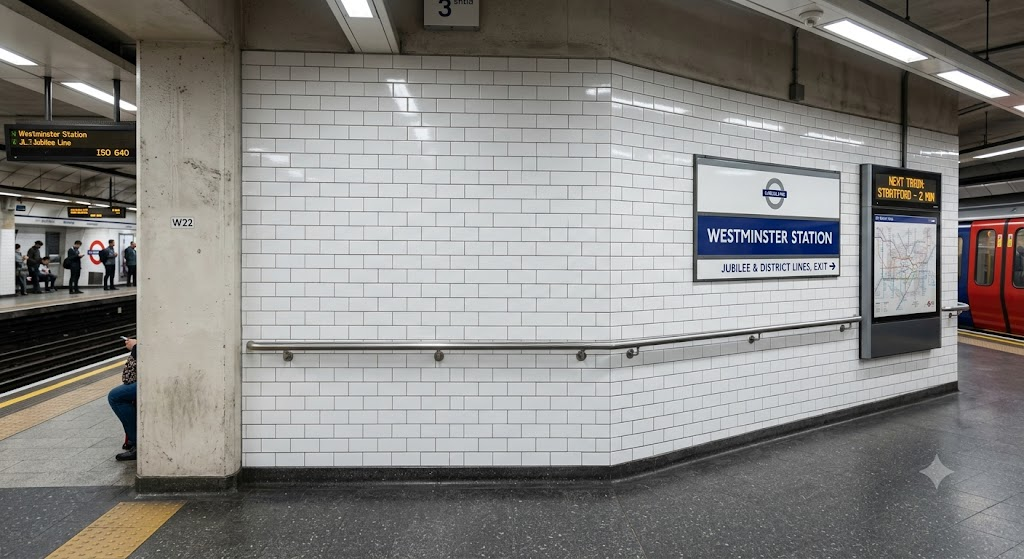
If we take the example of a subway station wall, the image below should be classified as Pass_clean because the surface shows no unauthorized markings, etching, or damage.
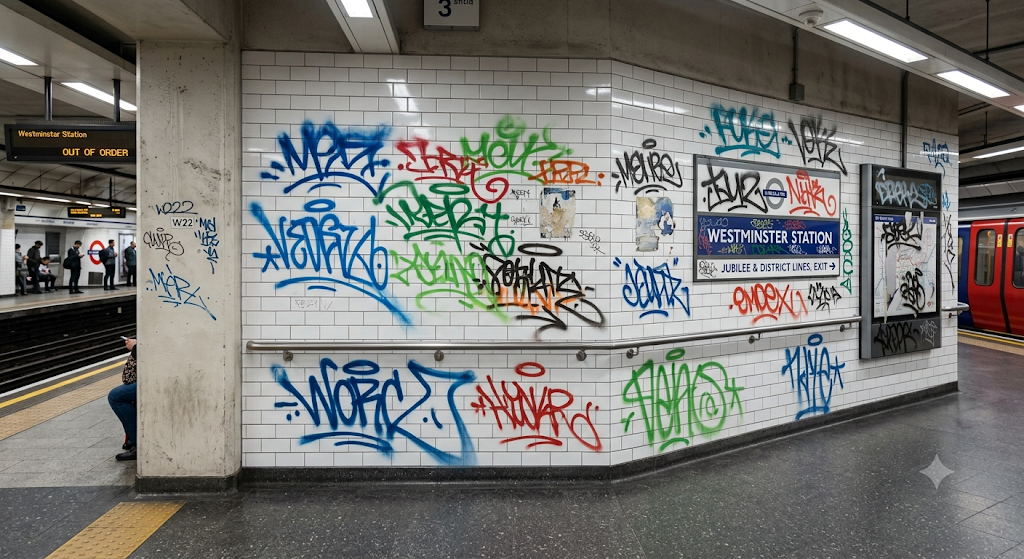
In contrast, the image below should be classified as Fail_vandalized. Although it depicts a similar wall, it fails the standard because it shows spray-painted tagging and scratched-in markings, making it a candidate for cleanup or repair.
Step 1: Create an Ability
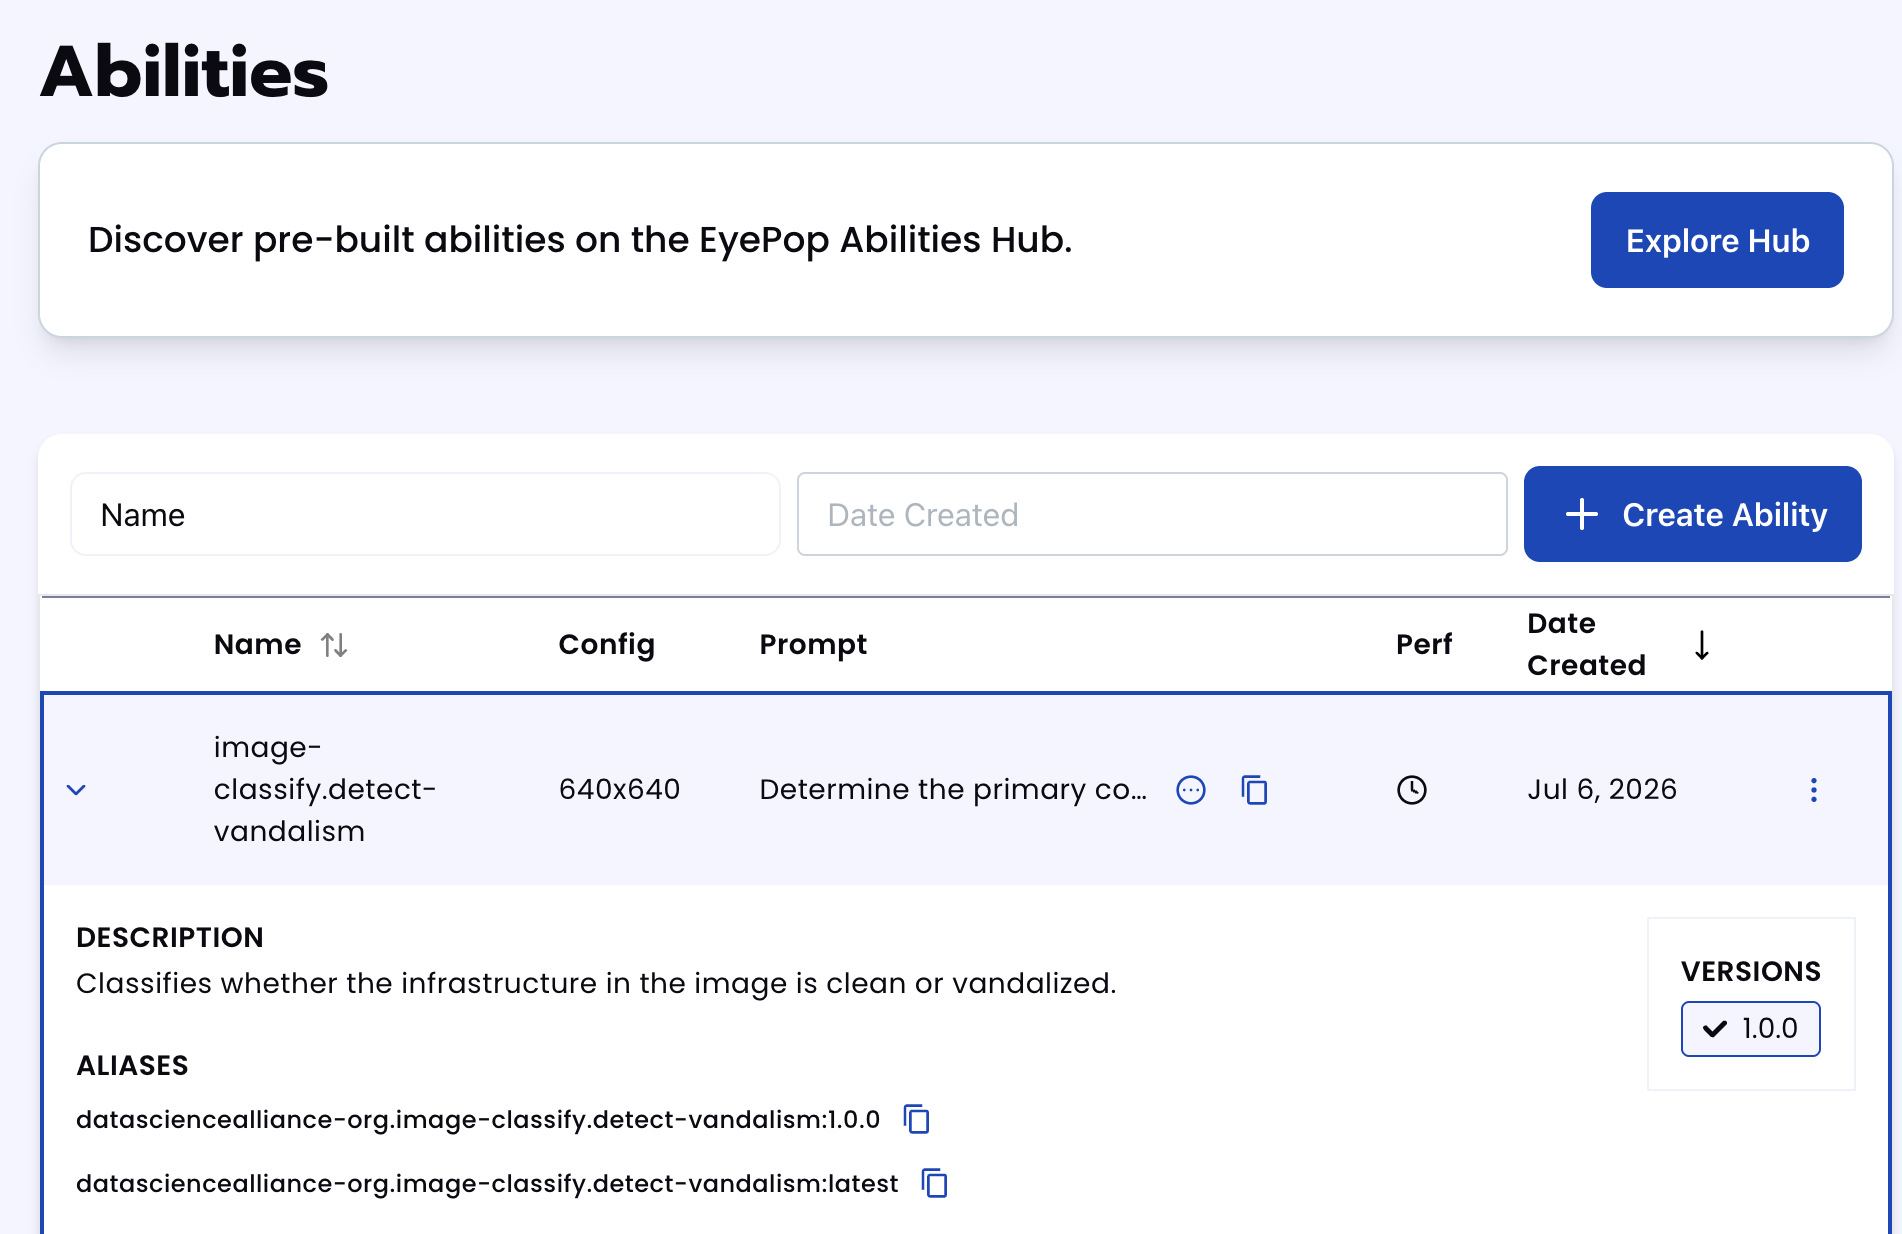
Go to the Abilities tab and select the button Create Ability.
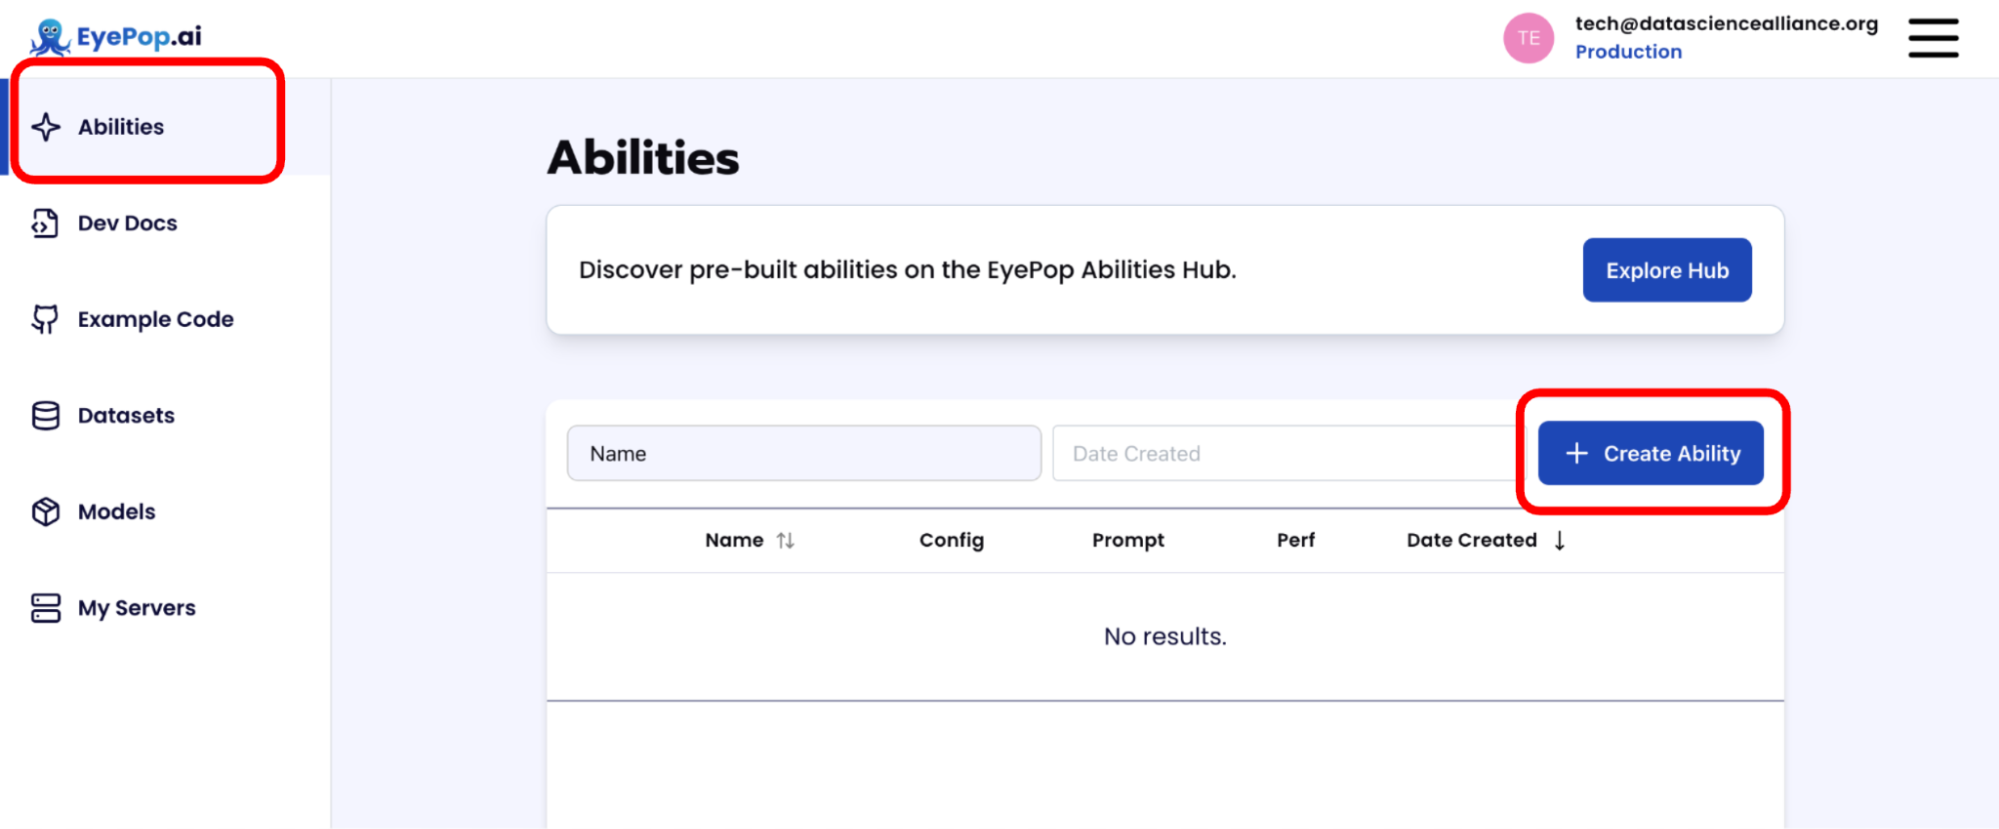
Fill out basic information about the ability such as its name and the description of the task itself. Since we are classifying an image, select the Task Type as Classify.

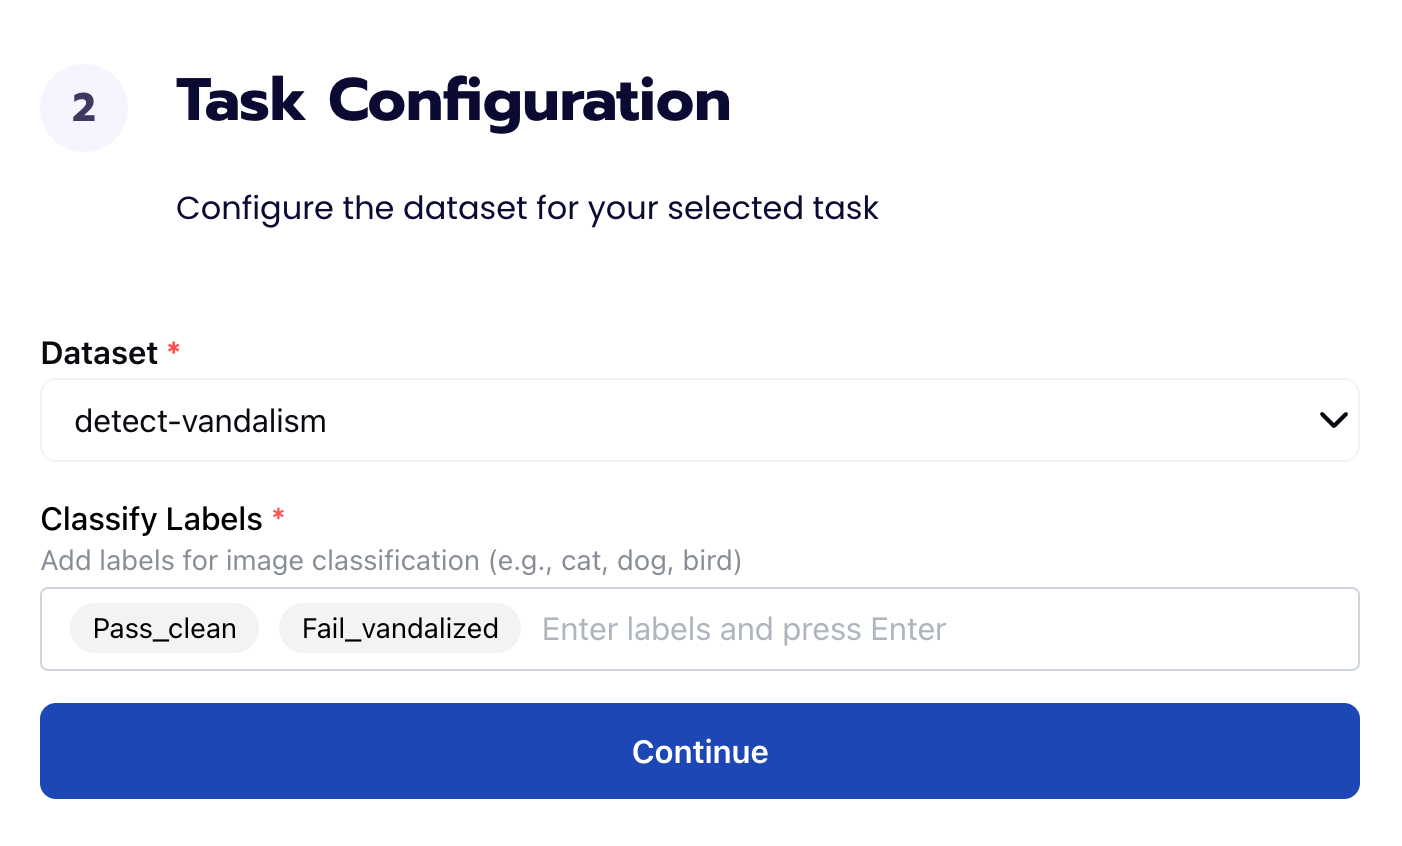
Step 2: Task Configuration
To configure the task, we need to select a dataset for the specific task. If you have already uploaded your images in a dataset simply select the name of your dataset. However, if you haven't already done so then select <New Dataset> and upload your images and create the labels Pass_clean and Fail_vandalized.
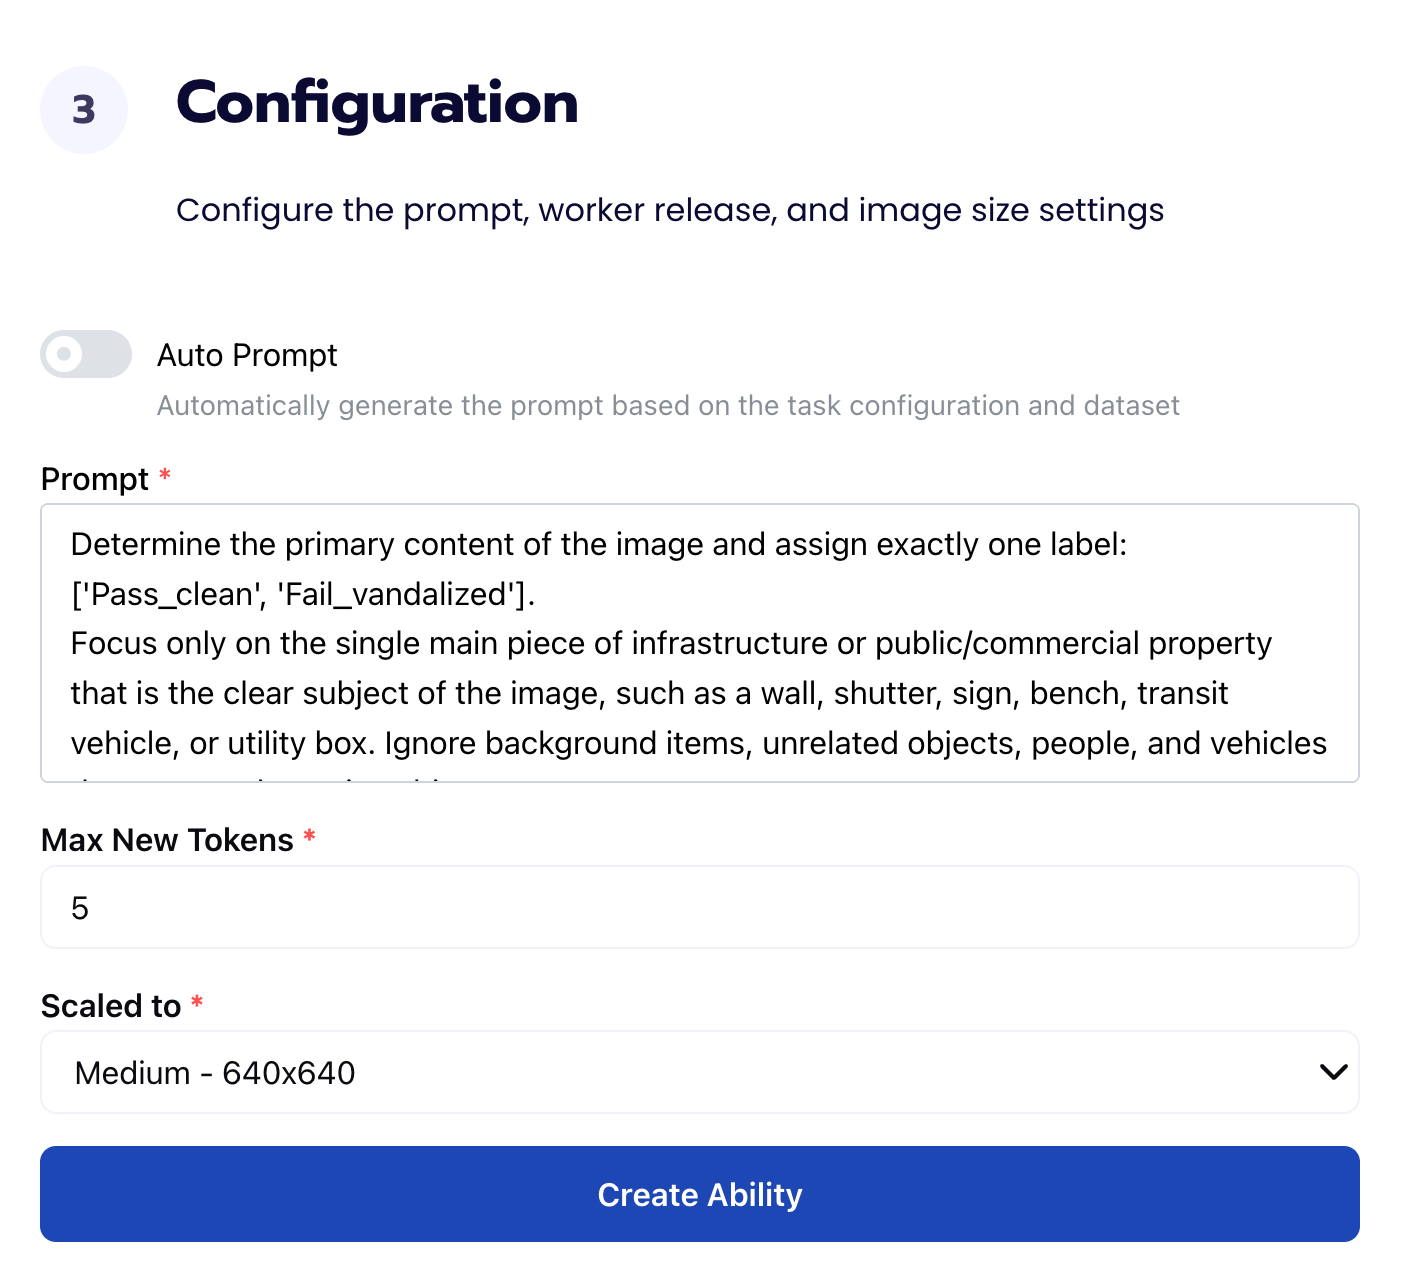
Step 3: Configuration
Our next step is to configure the prompt, select the model, and image size. For this use case, we recommend using the below prompt and settings for highest accuracy and best results.
Prompt:
Determine the primary content of the image and assign exactly one label: ['Pass_clean', 'Fail_vandalized'].

Focus only on the single main piece of infrastructure or public/commercial property that is the clear subject of the image, such as a wall, shutter, sign, bench, transit vehicle, or utility box. Ignore background items, unrelated objects, people, and vehicles that are not the main subject.

Choose 'Pass_clean' only if the image's main focus shows no unauthorized markings, damage, or defacement. The surface should appear as originally intended — intact, unmarked, and free of graffiti, stickers, posters, scratches, dents, or breakage.

Choose 'Fail_vandalized' if the image's main focus shows any unauthorized alteration or damage, including but not limited to:
- Spray paint, tagging, or stenciled graffiti
- Scratched, keyed, or gouged surfaces without paint
- Broken, smashed, or shattered glass
- Dents, kicks, or bent/broken structural elements (signage, fencing, poles, fixtures)
- Unauthorized stickers or wheatpasted posters/flyers
- Scorch or burn marks
- Forced-open panels or broken locks

Normal wear such as faded paint, dirt from weather exposure, or minor rust should not be classified as vandalized unless it is accompanied by one of the issues above.

If multiple types of damage are visible, still return 'Fail_vandalized' — this label does not distinguish between vandalism subtypes.

Return only the single best-fitting label.
Step 4: Evaluation
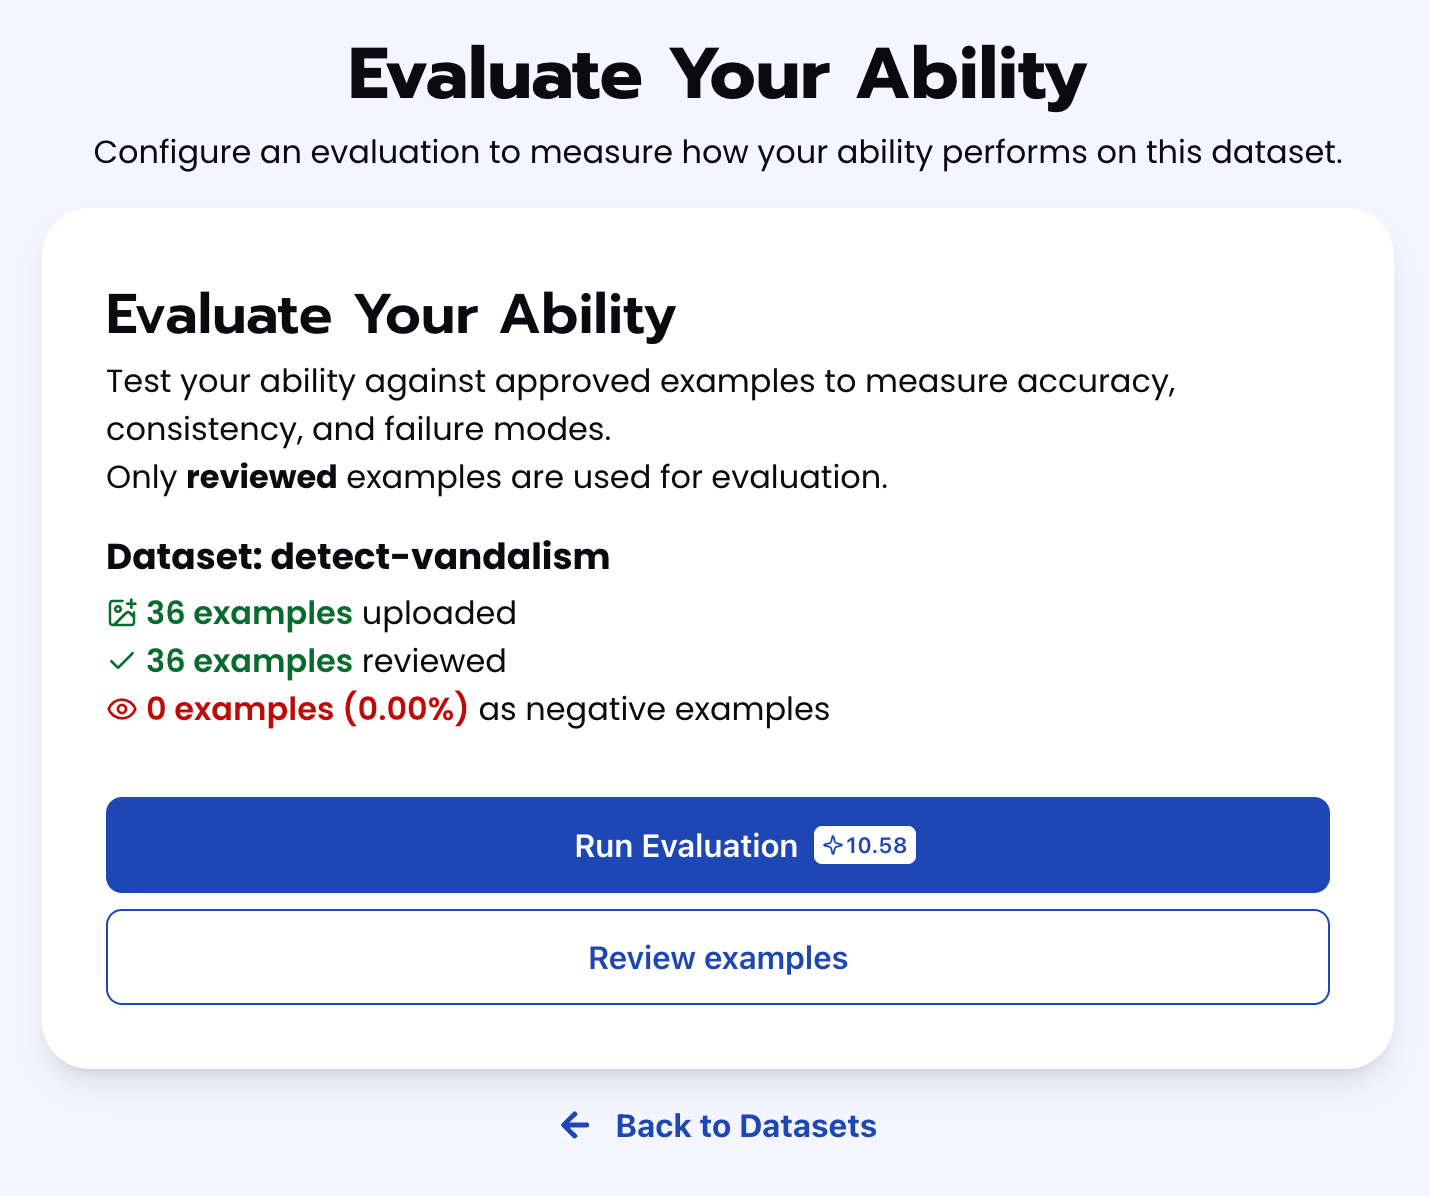
Test your ability against approved examples to measure accuracy, consistency, and failure modes. Only reviewed examples are used for evaluation.
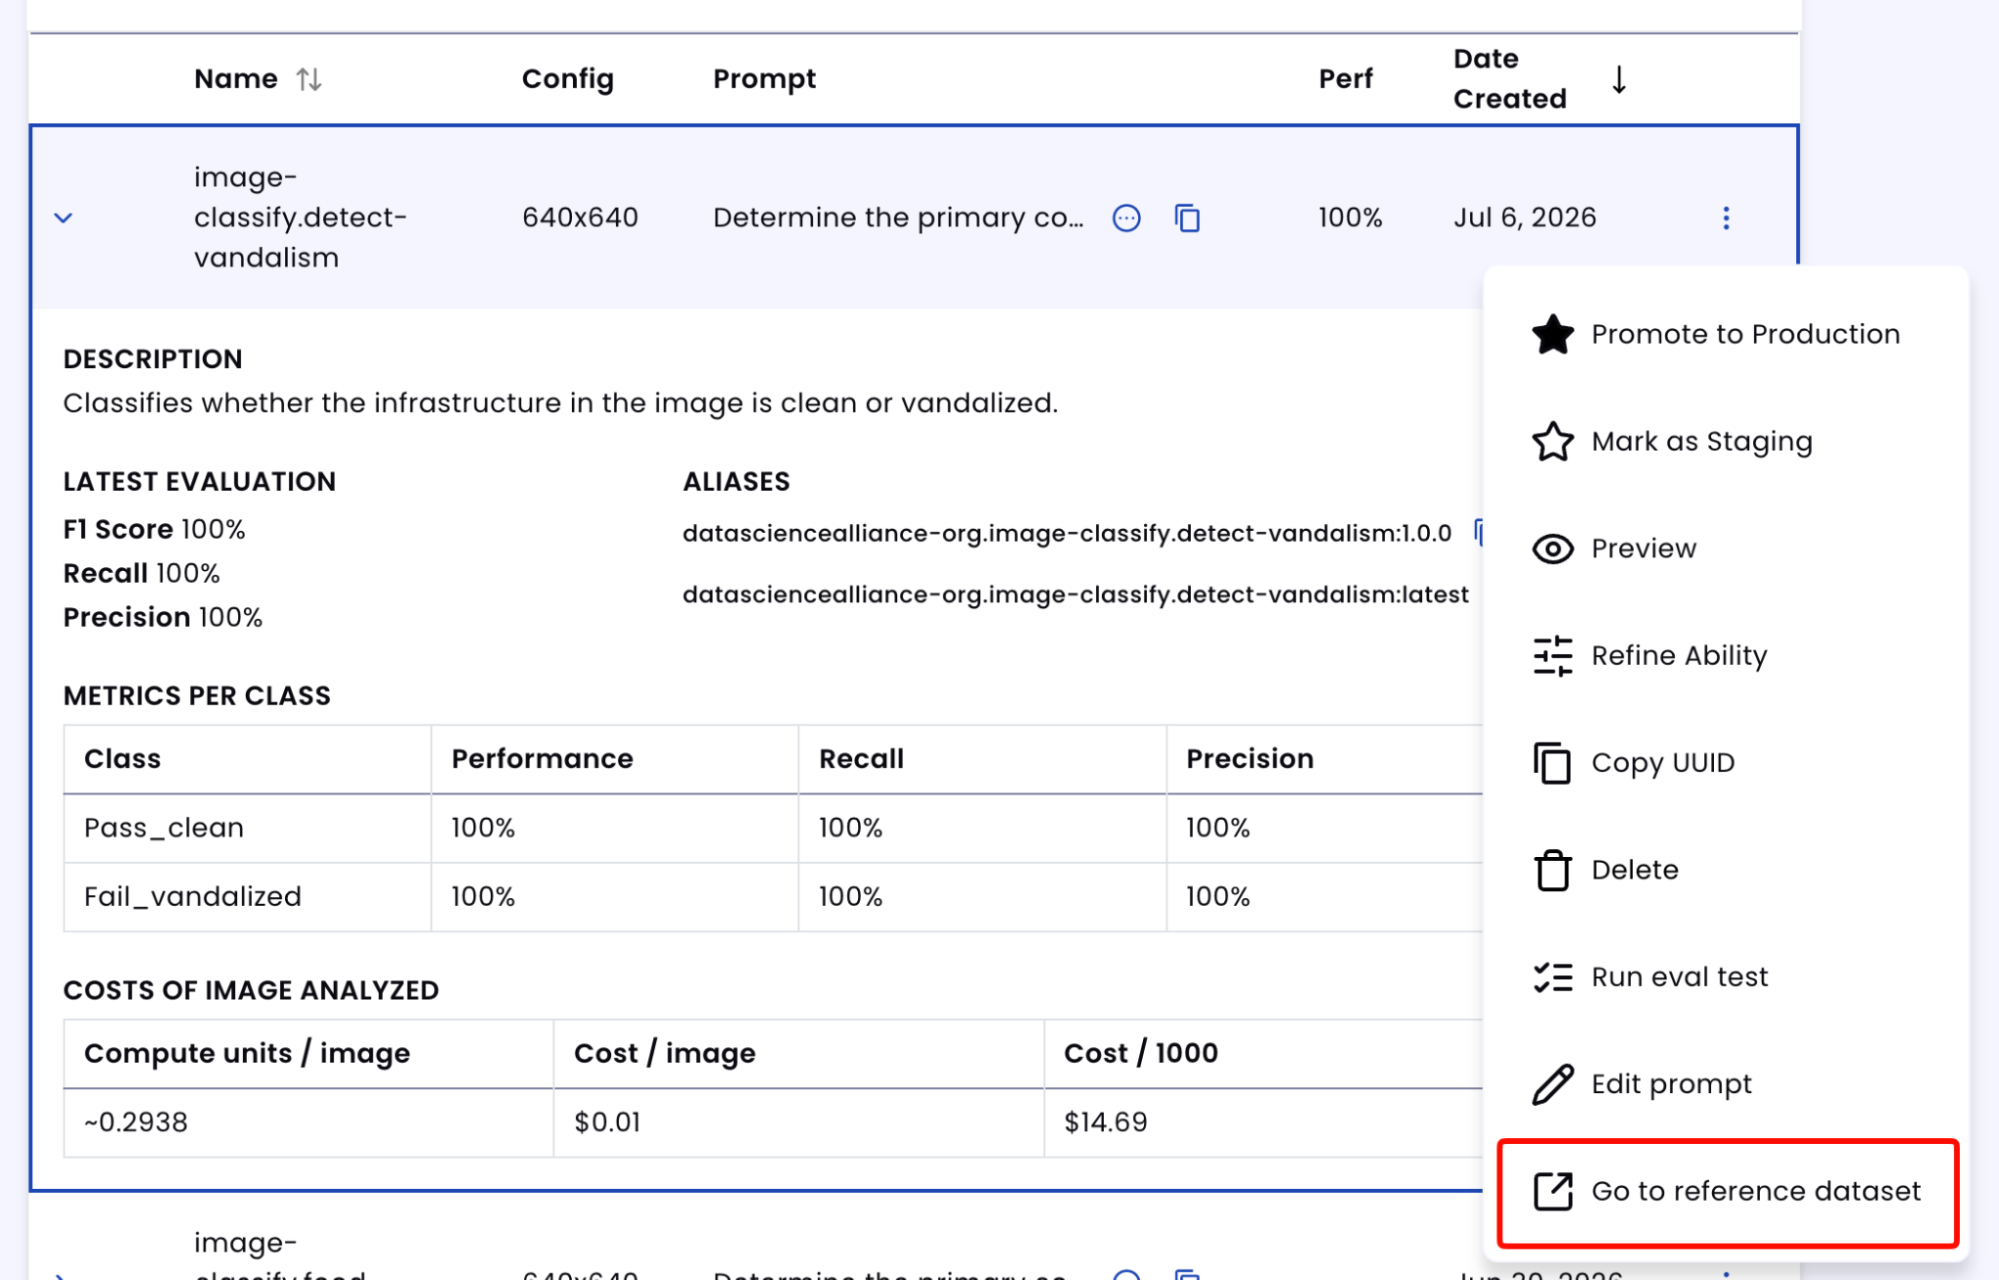
In addition to the performance, recall, and precision percentages on the Abilities tab, you can see a visualization of what the model predicted by revisiting the dataset. Click on the three dots and select "Go to reference dataset". Select one of the images in the dataset and click on the review button. After running the evaluation, you can see what the model labeled as Pass_clean or Fail_vandalized and compare it to your source of truth. With this, you can improve your prompts and thus improve your accuracy.
Tips for Accuracy
1. Explicit "Negative" Case
Telling the model exactly what not to look for is just as important as telling it what to look for. This is because if you only define Fail_vandalized by listing damage types, the model might over-flag normal wear and tear such as faded paint, weathering, rust, dirt buildup as vandalism simply because the surface doesn't look pristine.
In our prompt, the explicit negative case is the "normal wear" exclusion: faded paint, weather-related dirt, or minor rust should not be classified as vandalized unless accompanied by an actual sign of unauthorized alteration or damage. This helps prevent the model from defaulting to Fail_vandalized whenever a surface simply looks old or imperfect rather than deliberately damaged.
2. Define "Edge Cases"
The key to high accuracy is a deep understanding of your specific acceptance criteria. In a vandalism detection context, the line between Pass_clean and Fail_vandalized can be thin, especially for surfaces with legitimate wear or authorized markings that could be mistaken for damage.
Examples of edge cases include authorized public art or commissioned murals that could be mistaken for graffiti; official signage, permits, or notices posted on a surface versus unauthorized wheatpasted flyers; rust or weathering on metal that looks similar to scratched/keyed damage; construction or maintenance markings (spray-painted utility lines, chalk marks) that resemble tagging but are legitimate; and old, faded graffiti that has been painted over versus a fresh, active tag.
3. Use Balanced Examples
Make sure the dataset has enough examples across both classes (Pass_clean and Fail_vandalized) and across vandalism subtypes within Fail_vandalized (graffiti, physical damage, stickers, broken glass, burn marks). If the dataset leans heavily toward graffiti-only examples for Fail_vandalized, the model may become biased toward predicting Pass_clean whenever damage is present but doesn't involve paint. For example, a smashed window or bent sign with no tagging.
4. Use Synthetic Images Carefully
Synthetic images can help create more examples across environments (transit, commercial, municipal, public spaces) and vandalism types. However, the synthetic images should still look like realistic property/infrastructure documentation photos. Include variation in setting (subway wall, storefront shutter, utility box, park bench), lighting (day, night, artificial), and surface material (brick, painted concrete, corrugated metal, glass, wood) so the model does not overfit to one visual style or context.
For Pass_clean examples, the target surface should be intact and unmarked, with only normal, non-disqualifying wear (fading, minor dirt) visible. For Fail_vandalized examples, the target surface should show a clear, unambiguous form of unauthorized damage or defacement such as spray paint, scratching, breakage, stickers, or burn marks rather than ambiguous wear that could be mistaken for either class.
Get early access
Want to move faster with visual automation? Request early access to Abilities and get notified as new vision capabilities roll out.